Nếu bạn đang tìm cách để cài đặt Nextcloud 23 trên CentOS 7, thì bài hướng dẫn này là dành cho bạn. Bài viết sẽ hướng dẫn bạn cách cài đặt Nextcloud 23 trên CentOS 7 với PHP 7.3, Apache và MariaDB 10.4. Bạn có thể tùy chọn định cấu hình mã hóa SSL với Let’s Encrypt để đảm bảo rằng quyền truy cập và dữ liệu đang được chuyển một cách an toàn.
Cài đặt với Debian:Cài đặt Nextcloud 23 trên Debian 11 / Debian 10
Nextcloud là một máy chủ đồng bộ hóa và chia sẻ dữ liệu được lưu trữ trên máy chủ mã nguồn mở. Nó được viết bằng PHP và JavaScript và hỗ trợ MySQL, PostgreSQL, SQLite và Oracle Database.
Cài đặt NextCloud trên CentOS 7 với bảo mật SSL Let’s Encrypt
Nextcloud cung cấp các cho người dùng Windows, Linux, macOS, Android và iOS giải pháp để đồng bộ hóa dữ liệu giữa Máy tính để bàn của bạn và máy chủ lưu trữ Nextcloud. Nó có giao diện web hiện đại và dễ sử dụng cho phép bạn truy cập tệp từ xa trên trình duyệt web.
Bài viết này sẽ hướng dẫn bạn cách để cài đặt và cấu hình Nextcloud trên máy chủ CentOS 7.
Tắt SELinux hoặc đặt nó ở Permissive mode
Để đảm bản hoạt động của Nextcloud, bạn nên cân nhắc tắt mô đun bảo mật SELinux:
sudo setenforce 0
sudo sed -i 's/^SELINUX=.*/SELINUX=permissive/g' /etc/selinux/config
Bước 1: Cài đặt PHP và httpd
Chúng ta cần cài đặt PHP và Apache để chạy Nextcloud trên CentOS 7. Đối với PHP, chúng tôi sẽ sử dụng PHP 7.3 vì đây là phiên bản PHP ổn định mới nhất dành cho CentOS 7.
sudo yum -y install epel-release yum-utils
sudo yum -y install http://rpms.remirepo.net/enterprise/remi-release-7.rpm
Vô hiệu hóa phiên bản Remi PHP 5.x và kích hoạt phiên bản Remi PHP 7.4:
sudo yum-config-manager --disable remi-php54
sudo yum-config-manager --enable remi-php74
Sau đó cài đặt Apache và PHP packages:
sudo yum -y install vim httpd mod_ssl php php-cli php-mysqlnd php-zip php-devel php-gd php-mcrypt php-mbstring php-curl php-xml php-pear php-bcmath php-json php-pdo php-pecl-apcu php-pecl-apcu-devel php-ldapKiểm tra lại phiên bản PHP của bạn
$ php -v
PHP 7.4.20 (cli) (built: Jun  1 2021 15:41:56) ( NTS )
Copyright (c) The PHP Group
Zend Engine v3.4.0, Copyright (c) Zend Technologies
Bước 2: Cài đặt và cấu hình MariaDB / MySQL
Thêm MariaDB YUM vào CentOS 7:
cat <<EOF | sudo tee /etc/yum.repos.d/MariaDB.repo
[mariadb]
name = MariaDB
baseurl = http://yum.mariadb.org/10.6/centos7-amd64
gpgkey=https://yum.mariadb.org/RPM-GPG-KEY-MariaDB
gpgcheck=1
EOF
Để cài đặt các phiên bản khác của MariaDB như 10.5 hoặc 10.4, hãy thay thế 10.6 bằng phiên bản khác trên baseurl.
Xóa yum cache index:
sudo yum makecache fastCài đặt MariaDB 10.6 trên CentOS 7:
sudo yum -y install MariaDB-server MariaDB-clientCó thể xem thêm chi tiết về gói đã cài đặt bằng lệnh sau:
$ rpm -qi MariaDB-server
Name        : MariaDB-server
Version     : 10.6.4
Release     : 1.el7.centos
Architecture: x86_64
Install Date: Wed Sep 29 19:28:29 2021
Group       : Applications/Databases
Size        : 125824191
License     : GPLv2
Signature   : DSA/SHA1, Wed Aug  4 18:58:00 2021, Key ID cbcb082a1bb943db
Source RPM  : MariaDB-server-10.6.4-1.el7.centos.src.rpm
Build Date  : Tue Aug  3 16:18:17 2021
Build Host  : centos74-amd64
Relocations : (not relocatable)
Vendor      : MariaDB Foundation
URL         : http://mariadb.org
Summary     : MariaDB: a very fast and robust SQL database server
Description :
MariaDB: a very fast and robust SQL database server

It is GPL v2 licensed, which means you can use the it free of charge under the
conditions of the GNU General Public License Version 2 (http://www.gnu.org/licenses/).

MariaDB documentation can be found at https://mariadb.com/kb
MariaDB bug reports should be submitted through https://jira.mariadb.org
Chạy và kích hoạt MariaDB service:
sudo systemctl enable --now mariadbBảo mật MariaDB bằng cách chạy mysql_secure_installation.
$ sudo mysql_secure_installation

NOTE: RUNNING ALL PARTS OF THIS SCRIPT IS RECOMMENDED FOR ALL MariaDB
      SERVERS IN PRODUCTION USE!  PLEASE READ EACH STEP CAREFULLY!

In order to log into MariaDB to secure it, we'll need the current
password for the root user.  If you've just installed MariaDB, and
you haven't set the root password yet, the password will be blank,
so you should just press enter here.

Enter current password for root (enter for none):
OK, successfully used password, moving on...

Setting the root password ensures that nobody can log into the MariaDB
root user without the proper authorisation.

Set root password? [Y/n] y
New password:
Re-enter new password:
Password updated successfully!
Reloading privilege tables..
 ... Success!


By default, a MariaDB installation has an anonymous user, allowing anyone
to log into MariaDB without having to have a user account created for
them.  This is intended only for testing, and to make the installation
go a bit smoother.  You should remove them before moving into a
production environment.

Remove anonymous users? [Y/n] y
 ... Success!

Normally, root should only be allowed to connect from 'localhost'.  This
ensures that someone cannot guess at the root password from the network.

Disallow root login remotely? [Y/n] y
 ... Success!

By default, MariaDB comes with a database named 'test' that anyone can
access.  This is also intended only for testing, and should be removed
before moving into a production environment.

Remove test database and access to it? [Y/n] y
 - Dropping test database...
 ... Success!
 - Removing privileges on test database...
 ... Success!

Reloading the privilege tables will ensure that all changes made so far
will take effect immediately.

Reload privilege tables now? [Y/n] y
 ... Success!

Cleaning up...

All done!  If you've completed all of the above steps, your MariaDB
installation should now be secure.

Thanks for using MariaDB!
Đăng nhập và kiểm tra phiên bản MariaDB:
# mysql -u root -p
Enter password:
Welcome to the MariaDB monitor.  Commands end with ; or g.
Your MariaDB connection id is 3
Server version: 10.6.4-MariaDB MariaDB Server

Copyright (c) 2000, 2018, Oracle, MariaDB Corporation Ab and others.

Type 'help;' or 'h' for help. Type 'c' to clear the current input statement.

MariaDB [(none)]> SELECT VERSION();
+----------------+
| VERSION()      |
+----------------+
| 10.6.4-MariaDB |
+----------------+
1 row in set (0.000 sec)

MariaDB [(none)]> q
Bye
Bạn cũng có thể kiểm tra phiên bản bằng cách sử dụng:
# mysql -V mysql Ver 15.1 Distrib 10.6.4-MariaDB, for Linux (x86_64) using readline 5.1Sau khi cài đặt, hãy đăng nhập với tư cách root vào bảng điều khiển MySQL và tạo cơ sở dữ liệu mới cho Nextcloud.
$ mysql -u root -p
CREATE USER 'nextcloud'@'localhost' IDENTIFIED BY "StrongPassword";
CREATE DATABASE nextcloud;
GRANT ALL PRIVILEGES ON nextcloud.* TO 'nextcloud'@'localhost';
FLUSH PRIVILEGES;
QUIT
Bước 3: Download và cài đặt Nextcloud trên CentOS 7
Tải xuống phiên bản mới nhất của Nextcloud:
sudo yum -y install wget unzip wget https://download.nextcloud.com/server/releases/latest-23.zipGiải nén file vừa download:
unzip latest-23.zip
rm -f latest-23.zip
Di chuyển thư mục nextcloud tới /var/www/html.
sudo mv nextcloud/ /var/www/html/Tạo thư mục dữ liệu để lưu trữ các tập tin đã tải lên Nextcloud. Đây có thể là bất kỳ đường dẫn nào.
sudo mkdir /var/www/html/nextcloud/data
sudo chown apache:apache -R /var/www/html/nextcloud/data
Cấp quyền cho người dùng và nhóm.
sudo chown apache:apache -R /var/www/html/nextcloud
Bước 4: Cấu hình Apache VirtualHost
Bây giờ tạo file cấu hình Apache cho Nextcloud.
sudo vim /etc/httpd/conf.d/nextcloud.confDán nội dung bên dưới vào tệp.
<VirtualHost *:80>
  ServerName files.example.com
  ServerAdmin admin@example.com
  DocumentRoot /var/www/html/nextcloud
  <directory /var/www/html/nextcloud>
    Require all granted
    AllowOverride All
    Options FollowSymLinks MultiViews
    SetEnv HOME /var/www/html/nextcloud
    SetEnv HTTP_HOME /var/www/html/nextcloud
  </directory>
</VirtualHost>
Đặt ServerName và thay đổi các cài đặt khác để phù hợp với nhu cầu sử dụng của bạn. Khi hoàn tất, hãy lưu tệp và khởi động dịch vụ httpd.
sudo systemctl enable --now httpdCấu hình SELinux:
sudo semanage fcontext -a -t httpd_sys_rw_content_t "/var/www/html(/.*)?" sudo sudo restorecon -Rv /var/www/htmlCấu hình Firewall:
Nếu bạn có một dịch vụ firewalld đang hoạt động, hãy cho phép các cổng http và https.
sudo firewall-cmd --add-service={http,https} --permanent
sudo firewall-cmd --reload
Bước 5: Cấu hình Apache với bảo mật SSL Let’s Encrypt
Để sử dụng Let’s Encrypt SSL certificate, trước tiên cần cài đặt certbot
sudo yum -y install epel-release
sudo yum -y install certbot
Sau đó, yêu cầu chứng chỉ SSL.
export DOMAIN="files.example.com"
export EMAIL="admin@example.com"
sudo certbot certonly --standalone -d $DOMAIN --preferred-challenges http --agree-tos -n -m $EMAIL --keep-until-expiring
Sửa đổi tệp cấu hình VirtualHost của bạn để giống như bên dưới.
<VirtualHost *:80>
   ServerName files.example.com
   ServerAdmin admin@example.com
   RewriteEngine On
   RewriteCond %{HTTPS} off
   RewriteRule ^(.*)$ https://%{HTTP_HOST}$1 [R=301,L]
</VirtualHost>

<IfModule mod_ssl.c>
   <VirtualHost *:443>
     ServerName files.example.com
     ServerAdmin admin@example.com
     DocumentRoot /var/www/html/nextcloud
     <directory /var/www/html/nextcloud>
        Require all granted
        AllowOverride All
        Options FollowSymLinks MultiViews
        SetEnv HOME /var/www/html/nextcloud
        SetEnv HTTP_HOME /var/www/html/nextcloud
    </directory>
     SSLEngine on
     SSLCertificateFile /etc/letsencrypt/live/files.example.com/fullchain.pem
     SSLCertificateKeyFile /etc/letsencrypt/live/files.example.com/privkey.pem
   </VirtualHost>
</IfModule>
Bước 6: Truy cập trang quản trị Nextcloud và hoàn tất cài đặt
Mở URL máy chủ nextcloud của bạn như đã cấu hình trên Apache: http://files.example.com, bạn cũng có thể sử dụng địa chỉ IP để truy cập giao diện Web của Nextcloud.
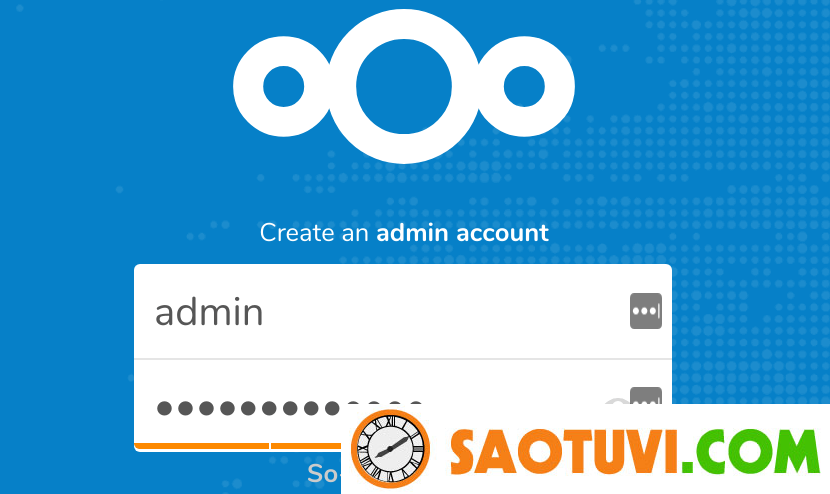
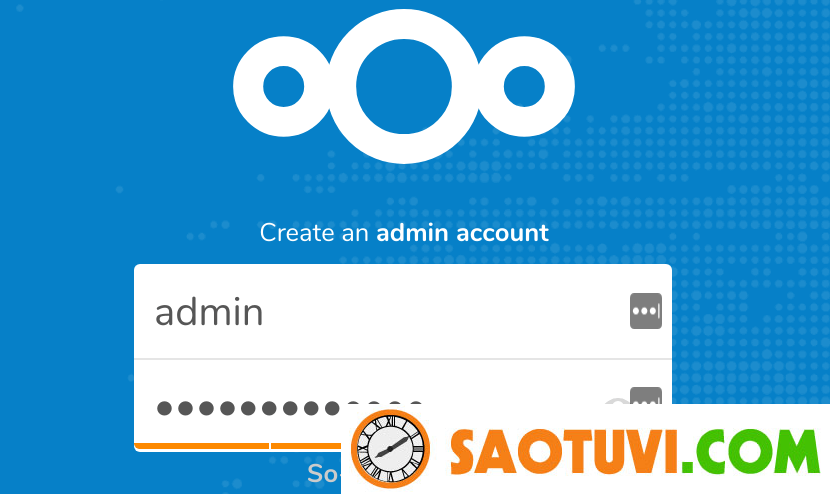
Tạo tài khoản admin ở trang đầu tiên.

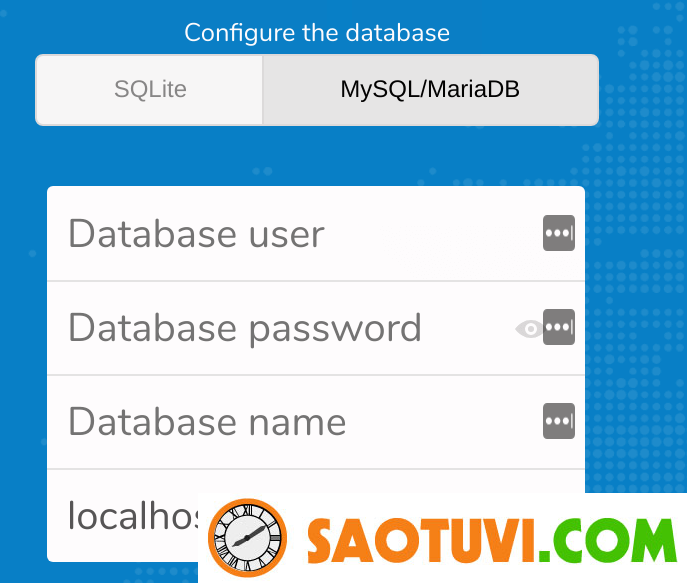
Nhập vào username and password cho tài khoản admin. Đồng thời cấu hình MySQL / MariaDB database.

Khi hoàn tất, hãy nhấp vào nút “Finish Setup”. Bạn sẽ được chuyển tới trang quản trị của Nextcloud. Bây giờ hãy cài đặt Nextcloud Agent trên thiết bị đầu cuối của bạn để bắt đầu đồng bộ hóa dữ liệu


